
DIY: Circle Skirt
1October 30, 2016 by jdflores2018
By: John Dave Flores / Inglewood,CA
Have you ever wanted to make your own clothes, but you don’t know where to start? Try the circle skirt, one of the easiest sewing projects ever.
What you will need:
- Sewing machine
- Fabric scissors
- a yard of stretchy fabric
- large piece of paper
- Pencil
- Measuring tape
- Elastic waistband
- Ruler
- Pins
- An iron (optional)
Step 1: Measuring
Measure the circumference of your waist, then measure from the waist to the desired length of the skirt. Next, divide your waist measurement by 4, let’s call this measurement A and the length of the skirt measurement B. Write down your measurements (waist circumference, quarter of waist, skirt length) so you won’t forget them.
Step 2: Skirt Pattern-Making
2-1 On the large piece of paper, mark measurement A on both sides of one corner . Next, identify your waist measurement on the ruler and place it on the corner of the paper (the beginning of the ruler should be where your first measurement A mark is). Then slowly turn the ruler and make separate marks along the width of the ruler until you reach the other measurement A mark. Connect those marks and you should have your first quarter circle.

Step 2.1 (John Dave Flores)
2-2 Place the beginning of your measuring tape where the waist quarter-circle is. Second, mark measurement B starting from both ends of the waist quarter-circle. As you did in step 1, make marks that lead from the first measurement B mark to the other, and connect them to get your skirt length quarter circle.
2-3 On another piece of paper, draw a straight line with the length of your waist measurement plus an inch. Next draw the height of the waistband, which is double the width of the elastic waistband plus half an inch. Finally, draw another straight line parallel to the waist length and parallel to the waist height. You should have drawn a rectangle. Finally, cut along the lines.
Step 3: Cutting the Waistband Fabric Piece
Place the waistband pattern along the edge of the fabric vertically then cut beside the paper.
Step 4: Cutting the Skirt
Now that you have your skirt pattern, cut away the excess paper by cutting along the lines. Before cutting any of the fabric, fold it 2 times in half. After folding, put your skirt pattern on the folded side of the fabric (don’t put it where the fabric opens to show its backside). With your fabric scissors, carefully cut a half-inch away from your waist quarter circle and cut a quarter inch away from your skirt length quarter-circle. Cutting away from the pattern allows us to attach the waistband and hem the bottom of the skirt.

Fold the fabric vertically then horizontally (John Dave Flores)
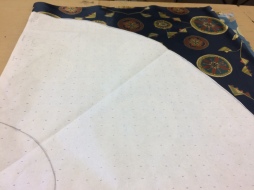
(John Dave Flores)
Step 5: Making the Waistband
5-1 Before cutting the elastic waistband, add two inches to your waist measurement. Next, cut the elastic to the appropriate length. Then layer an inch of the waistband onto its other end. Then sew two vertical (or horizontal) straight-stitches to lock them together.

Step 5-1 (craftsy.com)
5-2 Take your waistband fabric piece, turn it inside out, and fold it vertically in half. Then, then sew it together with a straight stitch and a half-inch seam-allowance. Finally, join your elastic waistband and waistband fabric piece together and fold it over the elastic so the right side is showing and the elastic is inside the fabric piece.
Step 6: Sewing the Waistband to the Skirt
First, make sure that the circle skirt piece is right side out. Second, slide the waistband onto the waist circle, open side up. Third, pin the waistband onto the waist so it doesn’t move while sewing. Remember that we added half an inch onto the waistband pattern, so there is an extra quarter-inch of fabric; line that up to the waist circle. Fourth, sew a straight stitch and half inch seam allowance to attach the waistband onto the waist circle. If the skirt turns out to be bigger than the waist, evenly pleat the fabric and pin to the waistband before sewing them together.

(itsalwaysautumn.com)

(itsalwaysautumn.com)
Step 7: Hemming the Skirt
Turn the skirt inside out and fold a quarter inch of the edge of the skirt. As you are folding iron the fold. The ironing will help make the folds stay in place so you won’t have a difficult time sewing. If you don’t want to iron, pin the folds in place and just take them out when you are sewing. The final step is to sew the fold with a quarter-inch seam-allowance forming a hem.

(blog.colettehq.com)
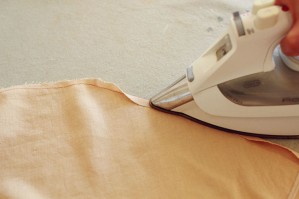
(blog.colettehq.com)
There you have it! A great, personalized edition to your spring/summer wardrobe.
How did your skirt come out? Leave a comment to let me know!

YES JOHN
LikeLike